
Back-to-back installations require that the pressure balancing cartridge be "flipped" or rotated 180 degrees in order for both units to function properly. Flipping the cartridge will reverse the hot and cold water supply lines so that the faucet works like a traditional hot/cold unit. The cartridge may also be flipped to correct a hot/cold reversal resulting from connecting the supply lines to the incorrect sides of the valve.
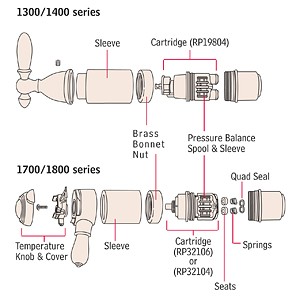
There are two types of valves. Choose A or B below depending on your series
A. 1300/1400 Series (RP19804)
Here are the steps to follow in reversing the operation of your faucet.
- Before you begin, make sure that you shut off the water supply to the faucet.
- Remove the handle. A clear knobs will have a Phillips head screw located just under the plastic cap; a lever handle usually has a small set screw located on the side.
- Slide off the finished metal (chrome, polished brass, white or almond) sleeve that covers the valve.
- Unscrew the bonnet nut. The bonnet nut is a large brass ring and should unscrew by hand. If it is too tight, wrap a towel around the bonnet and use a pair of channel locks. Make sure that the entire valve body does not start to rotate as you do this. Remove the bonnet nut.
- Do not pry the valve cartridge out of the body with a screwdriver. Place the handle on the cartridge stem and rotate it counterclockwise approximately 1/4 turn after the stop has been contacted. Remove the handle. Grasp the brass stem in the center of the white plastic assembly and pull it directly out, away from the wall. The valve cartridge should slide out of the body.
- Reinstall the cartridge after rotating the entire unit 180 degrees. Make sure that the raised plastic stop, marked "HOT", is on the right side of the valve.
- Reattach the bonnet nut, trim sleeve, and handle.
B. 1700/1800 Series (RP32104 or RP32106)
Here are the steps to follow in reversing the operation of your faucet.
- Before you begin, make sure that you shut off the water supply to the faucet.
- Make sure the water supplies are turned off.
- Remove the sleeve, bonnet and cartridge. Pull the cap from the cartridge and rotate it 180 degrees or one half turn. Reinstall the cap on the cartridge.
- Reinstall the cartridge making sure that the key is fully engaged with the slot in the brass body. Be sure the "HOT SIDE" marking on the cartridge is facing toward the right.
- Install the bonnet and sleeve making sure the O-Ring is behind the groove on the brass valve body.
-
Install the volume control handle with the lever to the right, then turn the handle to the "ON" position. Install the temperature control knob and rotate it to the left. The water should be hotter the further you rotate it to the left.