
Your Delta® faucet is designed for leak-free performance. Through normal use, and depending on the water conditions in your area, seats and springs experience wear and may need to be replaced occasionally. It is also possible that there is sediment or debris in your faucet. If your faucet drips from the spout, follow these simple steps:
First attempt to flush the debris from the system:
- Remove the aerator.
- Turn off the water supplies.
- Turn the faucet handle to the "on" position.
- Turn the water on at the supply.
- Flush the faucet and supply lines for one minute.
- Wash any debris from the aerator before you replace it.
- Turn off the water using the faucet handle.
Next, check the seats and springs and the ball valve. You may need to replace those using Delta Genuine Parts.
- Shut off water supply.
- Cover drain opening so parts don't fall into it.
- If you have a lever handle with a red and blue hot/cold button, pry it off to expose the set screw. Loosen the set screw with an Allen wrench and remove the handle. If you have a knob handle, pry off the handle button, remove the screw and lift off the handle.
- Unscrew the cap counterclockwise and lift off. If the cap is too difficult to unscrew by hand, loosen the gray or white adjusting ring in the cap and try again. If it is still too difficult to remove by hand, place a crescent wrench at the top of it and turn counterclockwise. To avoid damaging the faucet finish, you may want to place a jar opener gripper between the cap and wrench or a heavy cloth such as a towel between the cap and wrench. CAUTION: IF YOU NOTICE THE CAM TURNING ALSO, QUIT TURNING IMMEDIATELY AND CALL A PLUMBER.
- Remove cam, packing and ball by lifting up on ball stem.

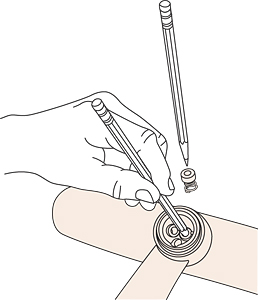
- Remove seats and springs. You can lift them out with a pencil or an Allen wrench.
- Wipe inside of body with a soft cloth, including where seats and springs sit.
- Place new seats over new springs (RP4993) and insert into sockets in body using a pencil or an Allen wrench. (Small end of spring goes into seat and large end of spring goes into the faucet body.)
- If a stainless steel ball is already installed, check it for damage or mineral deposits. Clean it by soaking it in vinegar and wiping it with a rough towel. If the ball appears to be scratched or damaged, you may also need to replace the ball. To replace a round-stem ball (cylindrical stem), use Delta Genuine Part RP70. To replace a diamond-stem ball (flat-sided stem), use Delta Genuine Part RP212. Place ball into body. (Lever handle faucet bodies will have a small straight steel pin inside; be sure to engage pin with slot on side of ball.)
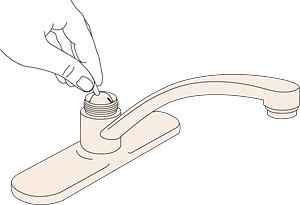
- Place packing and cam over stem of ball and engage tab on cam with slot in body. (The peak of the triangle in the cam for a lever handle faucet will be facing the spout.) Push down.
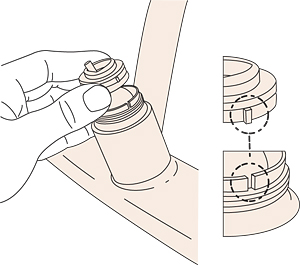
- Partially unscrew adjusting ring and then place cap over ball stem and hand tighten onto body, while pushing down on cam to keep cam's tab engaged with slot in body.
- Tighten the adjusting ring until no water leaks around the stem when the faucet is in the full on hot and cold mixed position and pressure is exerted down on the handle.
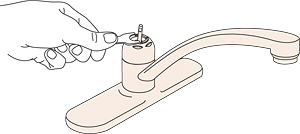
Loosening and tightening the adjusting ring also controls how hard or easy the handle is to use. Over tightening of the adjusting ring can cause premature wear of the seal surfaces necessitating frequent repairs.
If the leak persists, check the faucet's stainless steel liners. Replace the entire faucet if the liners are missing, damaged or sticking up above the brass valve body.